I bought my first TENS unit two years into my psoriatic arthritis diagnosis. I was 29, I had already hit the daily NSAID ceiling my rheumatologist was comfortable with, and I needed something that could interrupt the pain signal on a Tuesday afternoon without adding more medication to the pile. The AUVON Dual Channel TENS Unit cost me less than a copay. I had absolutely no idea how to use it.
The instruction pamphlet that came in the box was eight pages of diagrams with labels in four languages and a warning list longer than the actual instructions. There was nothing in there about rheumatoid arthritis, nothing about where to put the pads when your SI joint is on fire at 11 p.m., and nothing about which of the 24 modes is actually worth using when your pain is inflammatory, not muscular. This guide is the one I wish I had found before I wasted two weeks using the thing wrong.
You need a TENS unit that keeps up with 24 modes, dual channels, and a battery that lasts a full week of daily sessions.
The AUVON Dual Channel TENS Unit has 4.6 stars from over 13,000 buyers. It is the machine I use for my own psoriatic arthritis and the one I recommend if you are new to electrical stimulation for joint pain.
Amazon Check Today's Price on Amazon →Step 1: Charge Fully Before Your First Session and Attach the Pads to the Leads
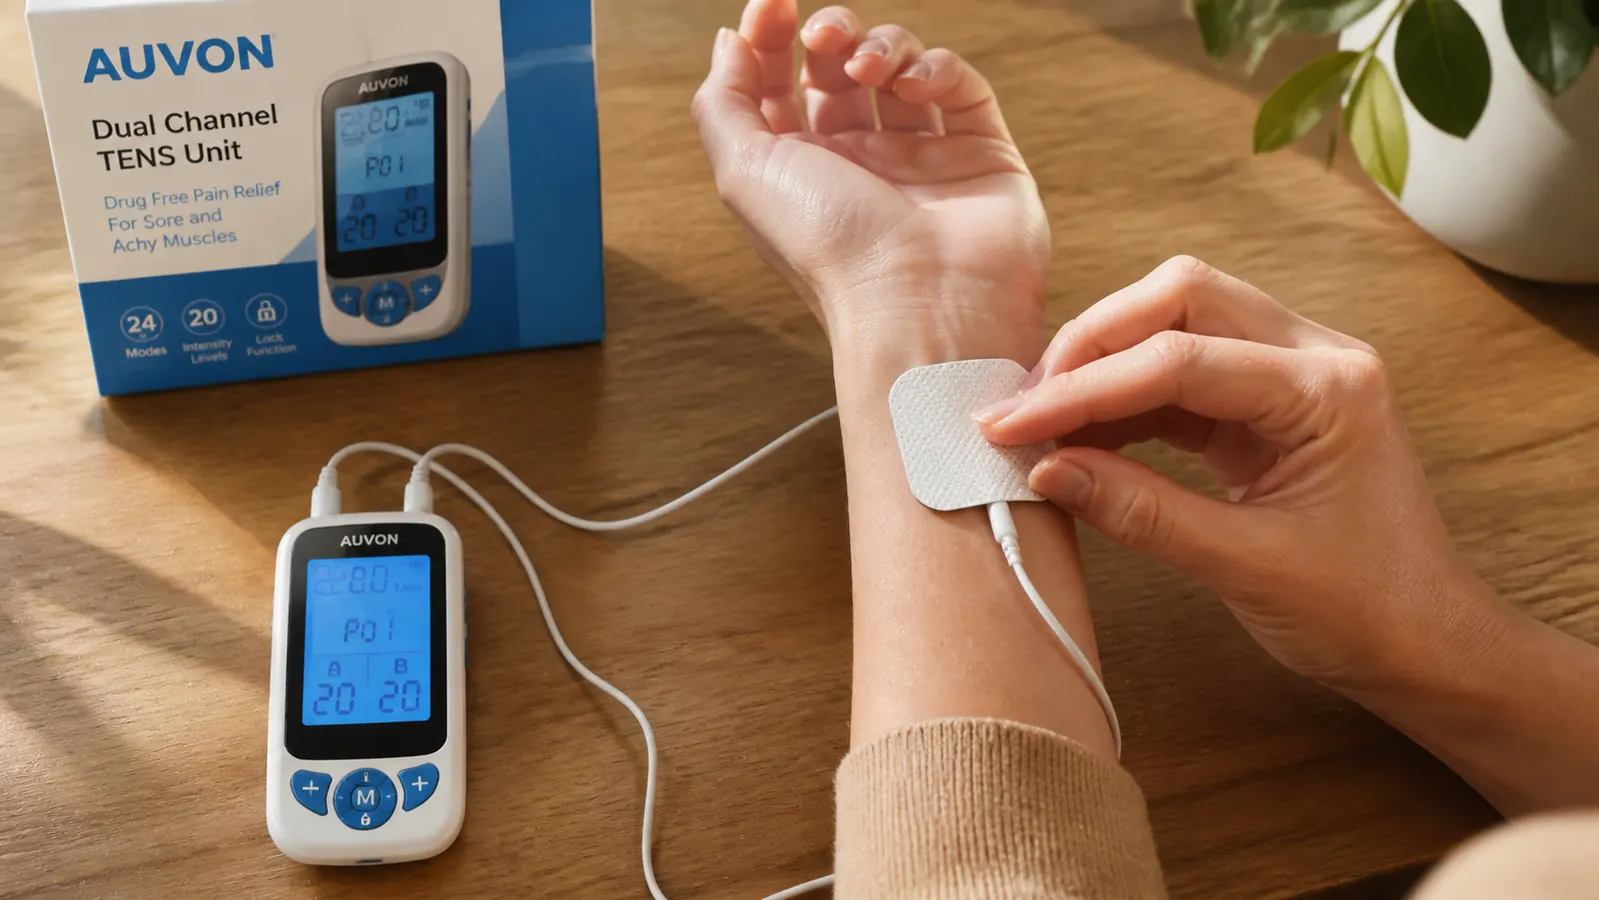
This sounds obvious, but plug the AUVON in for a full charge before you ever put it on your body. A half-charged unit will cut out mid-session, which is annoying and defeats the purpose of finishing a 20-minute pain gate cycle. Most units take about two hours from empty. The charging port on the AUVON is USB, so you can charge from a laptop, a wall adapter, or a portable battery bank.
While it charges, snap the electrode pads onto the lead wire connectors. Each lead has a small pin that clicks into the snap connector on the back of the electrode pad. The AUVON comes with 12 pads in several sizes. Start with the larger rectangular pads for your first session. The connection should feel firm, not loose. A loose pad connection is the number one cause of the "tingling in patches" problem new users complain about.
Before you ever put pads on a joint, test a low intensity setting on your forearm for 30 seconds. This is not about safety for most people. It is just about knowing what the sensation feels like so you are not startled when you put the pads on a more sensitive area like the wrist or the knee.
Step 2: Place the Pads Correctly for Your Affected Joint
Pad placement is where most new TENS users go wrong. The goal is to place the two pads from one channel on either side of the painful joint, so the electrical current passes through the joint space between them. Think of it as creating a circuit across the area you want to treat. The pads should be at least one inch apart and never touching each other.
For the five joints most commonly affected in inflammatory arthritis, here is where to place the pads. For the knee, put one pad above the kneecap and one below, on the inner or outer aspect depending on where your pain is worst. For the wrist, place one pad on the top of the wrist and one on the underside, just below the joint line. For the SI joint or low back, place pads on either side of the spine over the sacral area, never directly on the spine. For the shoulder, one pad on the front of the deltoid and one on the back, flanking the joint. For the hip or SI joint on a bad day, I go wide on either side of the hip itself, not over the bony prominence.
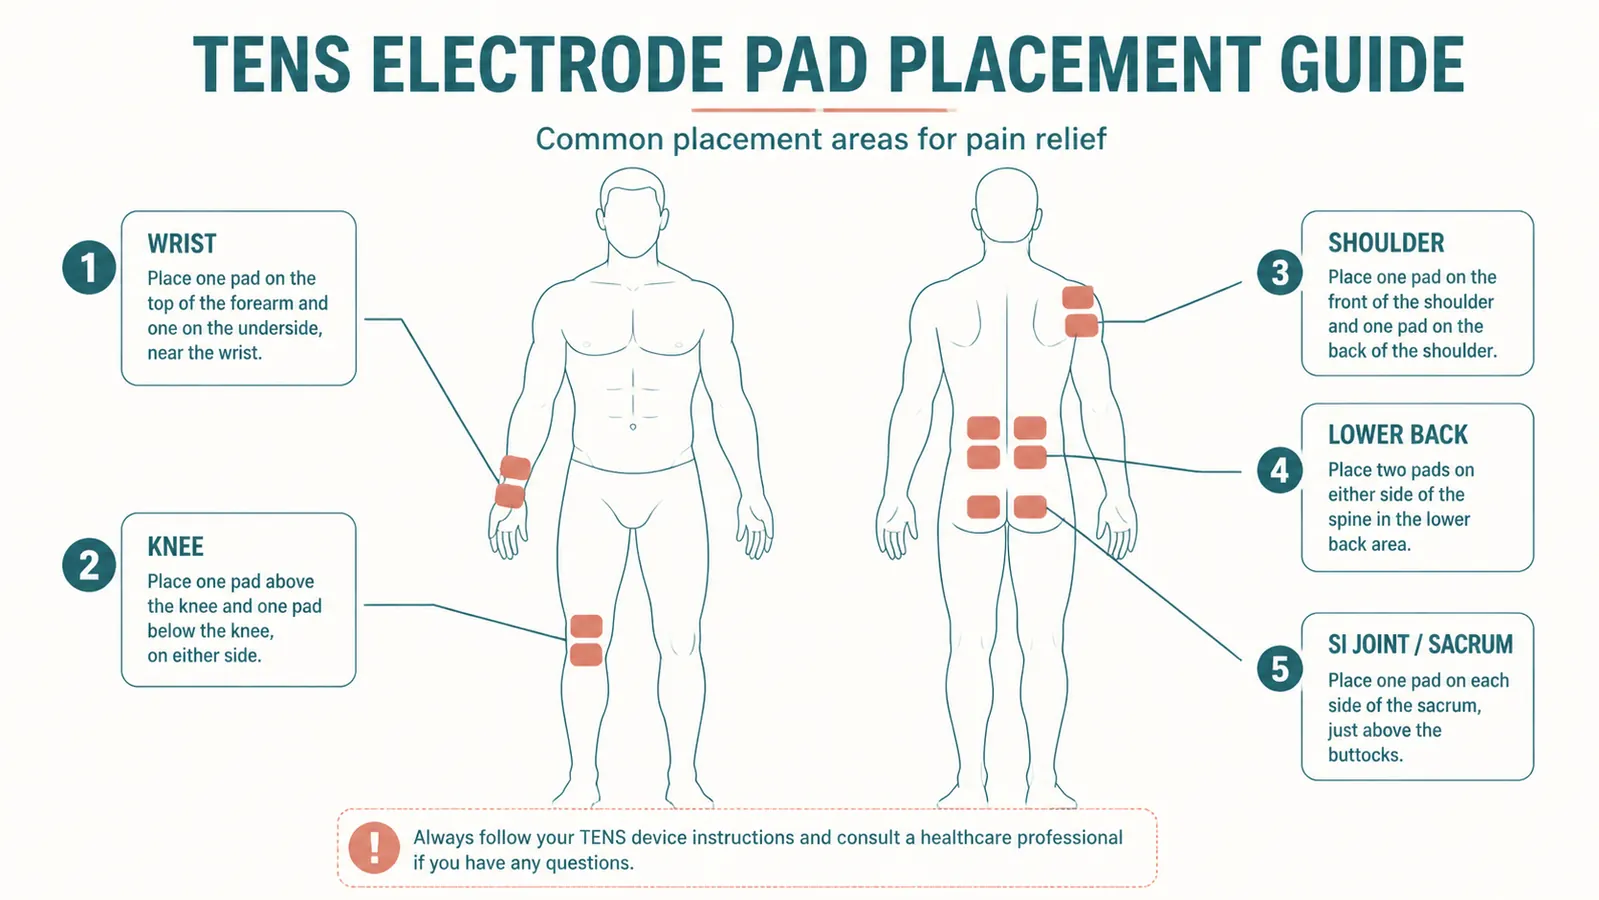
One thing that will not be in any pamphlet: for finger joints, small square pads placed on the palm side and back of the finger work surprisingly well for RA hand pain, but the intensity ceiling is lower because the tissue is thin. Start at a much lower setting and be patient.
Step 3: Start at the Lowest Intensity and Move Up Slowly
Turn the intensity dial all the way down before you power on, then bring it up gradually. You are looking for what TENS users call the "strong but comfortable" buzz. Not a faint tickle, not a sharp zap, but a firm, consistent sensation that you can feel clearly without it being unpleasant. It should not feel like a shock. If it ever feels like a shock, you have gone too high.
The AUVON has independent intensity controls for each channel. If you have pads on your knee and your SI joint at the same time, you can run them at different intensities. That is genuinely useful when one site is in an active flare and the other is just background maintenance pain. Most people land somewhere between intensity 8 and 15 out of 20 for arthritis use. I personally run around 12 on a normal day and around 9 during a flare when the skin over the joint feels more sensitive.
Step 4: Pick the Right Mode for What You Need Right Now
Twenty-four modes sounds like too many, and honestly most of them you will never use. For arthritis pain specifically, four modes are doing the real work. The Pulse mode (also labeled P or Gate in some units) is the one you want for general pain interruption. It uses a high-frequency burst pattern that activates the pain gate mechanism, essentially flooding the nervous system's pain pathway with non-painful input so the pain signal cannot get through as clearly. This is the mode that people describe as "turning down the volume" on their joint pain.
The Massage mode (labeled M or MA) runs a slower, rhythmic pattern that feels more like a kneading sensation. Good for surrounding muscle groups that have tightened around an inflamed joint. If your knee is flaring but the quad above it is rock-hard and adding to the compression, Massage mode on a pad placed above the kneecap can help release some of that secondary tension. The Knead mode goes deeper and is worth trying when the Massage setting starts to feel too gentle after a few sessions. The Tap mode mimics a rapid tapping pattern and is the one I reach for during breakthrough pain when I need the most disruptive signal I can send.
TENS does not cure inflammation. What it does is interrupt the pain signal long enough for your nervous system to stop amplifying it. For chronic arthritis pain, that interruption is worth more than it sounds.
Step 5: Run Each Session for 20 to 30 Minutes, Not Longer
This is the rule I broke most consistently for the first month and I paid for it. When TENS is working, it feels good. There is a real temptation to keep going past the 30-minute mark because the pain relief is still happening. The problem is that your nervous system adapts to the stimulation. After about 30 minutes of continuous use, the gate-control effect starts to diminish and the neurons involved in the sensation start to habituate. You end up getting diminishing returns, and then the session stops working before you have finished.
The practical protocol that works for me: 20-minute sessions once or twice a day for active pain days, 30-minute sessions for bad flare days. Leave at least 60 minutes between sessions on the same area. If I use the AUVON on my SI joint at 8 a.m., I do not use it on the same site again until at least 9 a.m. to 9:30 a.m. the next morning. That gap matters. Running TENS on the same area continuously for hours is a waste of your pads and your time.
Step 6: Do Not Use TENS Over Topicals or on Skin That Is Not Clean and Dry
If you use Voltaren gel, Biofreeze, lidocaine patches, or any other topical pain reliever on a joint, you cannot put TENS pads over the same site. The residue from the topical gets between the pad adhesive and your skin, breaks the electrical contact, and at best gives you uneven stimulation and at worst can cause a mild skin irritation from the combination of the topical chemical and the electrical current passing through it unevenly. If you use a topical in the morning, wait until it is fully absorbed and the skin surface is dry before applying pads. For thicker preparations like compounding creams, I wait at least two hours.
The pads also will not stick properly to skin that has lotion, sunscreen, or body oil on it. Clean the area with a damp cloth and let it dry fully before applying pads. This sounds fussy but it genuinely extends the life of your electrode pads, which are not free. A pad that has been applied to uncleaned skin will lose its adhesive in about five sessions. A pad applied to clean dry skin can last 30 sessions or more.
Step 7: Use the Post-Session Endorphin Window for Stretching
One of the real advantages of TENS that does not get mentioned enough: the 30 to 60 minutes after a session is the best window for gentle mobility work. The combination of reduced pain signal and the mild endorphin release from the stimulation means your pain threshold is genuinely higher during that window. Joints that are too stiff or painful to move through their full range before the session often have noticeably more mobility directly after.
I do a 10-minute gentle stretch routine after my morning TENS session. Nothing aggressive, no resistance, just moving each affected joint slowly through its comfortable range. The goal is to use the reduced-pain window to signal to the joint that movement is okay, which over weeks has a cumulative effect on morning stiffness. If you see a physical therapist, this is worth mentioning. Many PT protocols now deliberately sequence TENS before therapeutic exercise for exactly this reason.
Step 8: Maintain Your Electrode Pads Properly So They Last
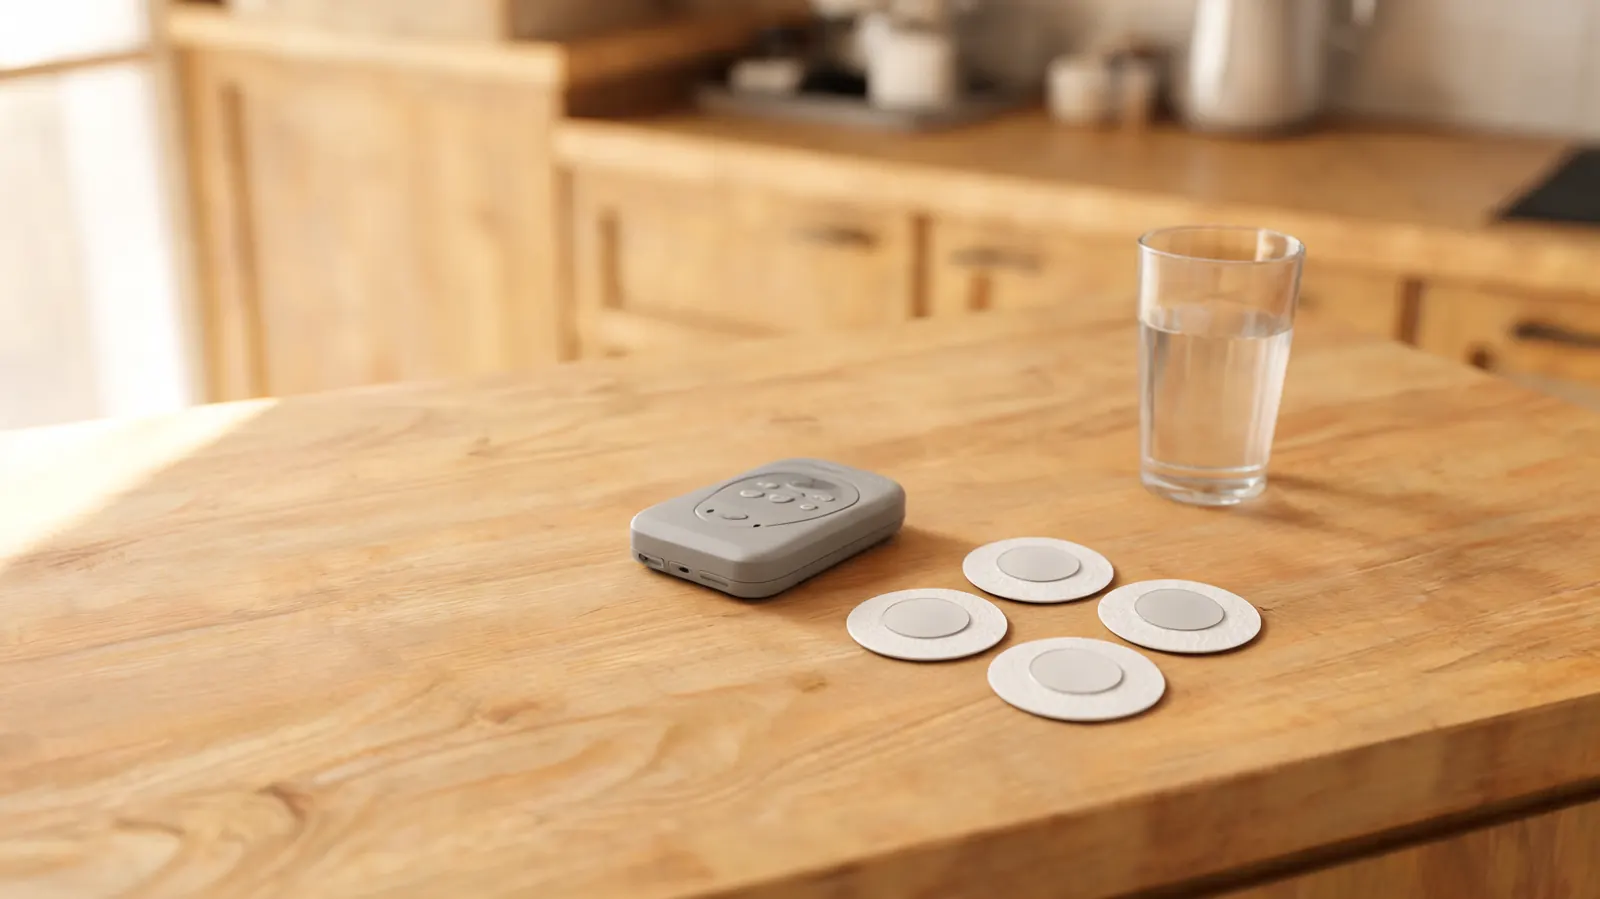
The ongoing cost of TENS is the pads. The AUVON comes with 12 pads, which sounds like a lot until you realize you can easily use two to four pads per session depending on which joints you are treating. Treat each pad like the reusable tool it is. After removing pads from your skin, stick them back onto the protective plastic sheet they came with, or the backing film included in the box. Store them in a cool, dry place. The adhesive on TENS pads is hydrogel-based and it degrades in heat. Storing your pads in the refrigerator between sessions, sealed in the original plastic, genuinely extends their life.
Always wash your hands before applying pads. The oils from your fingertips transfer to the adhesive surface and degrade the gel faster than almost anything else. If a pad starts to peel at the edges mid-session, press it back down with clean, dry fingertips. Once a pad will no longer stick reliably even on clean skin, replace it. A loose pad during a session can cause the current to concentrate unevenly, which feels unpleasant and is ineffective.
Step 9: Know the Safety Rules That Are Not Negotiable
Three hard rules, no exceptions. Do not use a TENS unit if you have a pacemaker or any implanted electrical device. The electrical current can interfere with the device's function. Do not use TENS on broken skin, open wounds, recent surgical incisions, or areas of active dermatitis. The current passes through fluid in broken tissue differently and can cause burns or worsen the irritation. Do not use TENS on the abdomen during pregnancy. Uterine stimulation is a real documented risk and this is not an area where caution is overcautious.
A few more rules worth knowing: never use TENS while sleeping, never use it while driving or operating machinery, and never place pads over the front of the throat, over your eyes, or directly on your spine. These are not hypothetical warnings. The AUVON manual lists them. For arthritis use specifically, none of these restrictions should come up if you are using the device as described in this guide.
Step 10: Know When TENS Is the Wrong Tool
TENS is very good at pain signal interruption. It is not a diagnostic tool and it does not treat underlying inflammation. If you have a joint that has become suddenly, severely more painful, hot, and swollen compared to your baseline, especially if you have fever, that presentation needs to be evaluated before you put TENS pads anywhere near it. Septic arthritis, a joint infection, presents this way and needs immediate medical attention, not pain management at home.
For acute injuries in the first 48 hours, ice and elevation are the right tools, not TENS. The inflammatory phase of a fresh injury is part of the healing process. Interrupting the pain signal with TENS before the acute phase has passed can lead to you moving a joint that needs to rest. After 48 to 72 hours, once you have ruled out fracture or significant structural damage, TENS becomes appropriate for the ongoing pain management phase. And for undiagnosed pain, any new joint pain that you have not yet discussed with a rheumatologist or orthopedist should be assessed before you start managing it. TENS is a tool for pain you already understand.
What Else Helps Alongside TENS
TENS works best as part of a stack. On bad days I combine it with compression on the same joint after the session. A good knee sleeve or SI belt worn after the TENS session extends the reduced-pain window by adding proprioceptive input and keeping the joint warm. The combination of electrical stimulation followed by compression is meaningfully better than either one alone for me.
If you are comparing TENS to a heating pad and wondering which to use, they do different things. Heat increases blood flow and relaxes surrounding muscle. TENS interrupts the pain signal at the nervous system level. They are not competing options. I use heat first for morning stiffness and TENS for breakthrough pain later in the day. For a deeper comparison of when each one makes more sense, the breakdown in TENS unit vs heating pad for arthritis pain goes into the mechanisms in detail.
If you want to understand all the specific ways electrical stimulation can help beyond just acute pain relief, including its role in sleep quality and flare management, the 10 ways a TENS unit helps young people with chronic arthritis article covers them one by one. And if you want the full honest account of what seven months of daily AUVON use has actually done for my inflammatory arthritis before committing to a purchase, the AUVON TENS unit review is the place to start.
The AUVON has 24 modes, 12 pads, and dual channels so you can treat two joint sites at the same time. It is rechargeable, fits in a jacket pocket, and costs less than a single copay.
If you are using this guide, this is the unit I use. Rated 4.6 stars from over 13,800 buyers. Free returns on Amazon if it is not right for you.
Amazon Check Today's Price on Amazon →